Nokia 5110 LCD based Arduino Datalogger with Menu
- Emmanuel Odunlade
- https://twitter.com/emmaodunlade
- emmaodunlade@gmail.com
- 8.416 Views
- medium
- Tested
Over time, we have built several Arduino based weather stations, real-time clocks, dataloggers and a dozen of projects based on Nokia 5110 LCD display. For today’s tutorial, we will merge all that we have learned from each of those tutorials and we will build a datalogger with a display that allows you to select different ways of viewing the data, a line graph or a bar chart, etc.
The idea behind today’s project is to show how real-time data can be plotted and displayed on the Nokia 5110 LCD. The project will also look at the development of a menu through which the user can select the different kind of plots/graphs to view the data.
At the center of today’s project is the Nokia 5110 LCD Display. The Nokia 5110 LCD is one of the most popular LCD display among makers. It was originally developed for use as a screen for cell phones and was used in lots of mobile phones during the ’90s. The display uses a low power CMOS LCD controller/driver, the PCD8544, which drives the 84×48px graphics display. In a normal state, the display consumes about 6 to 7mA which makes it quite ideal for low power devices. We have published quite a number of tutorials on this display that might help you understand how to drive it. Today’s use of the display will be to show that it can be used to plot real-time data and how different kind of graphs can be displayed on it.
Asides the Nokia 5110 LCD, we will use a DHT11 temperature and humidity sensor, DS3231 real-time clock, a rotary encoder, and an Arduino pro mini. The DHT11 will serve as the source for the data to be logged as it will measure temperature and humidity data from the environment and push to the display. The DS3231 will be used to generate a timestamp for the data and rotary encoder will be used to navigate through the menu that we will create on the LCD. All of these components will be driven by the cheap and tiny Arduino Pro Mini.
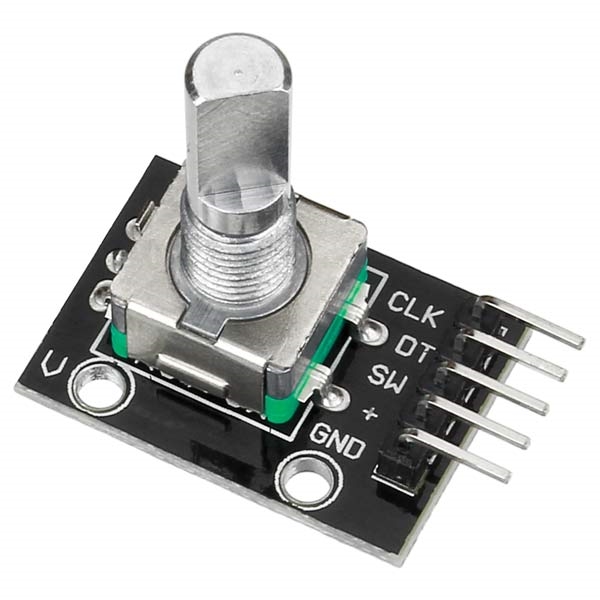
The project is similar to our Arduino Menu with Nokia 5110 tutorial and I will suggest you check it out to better understand of this project.
At the end of this tutorial, you would know; how to interface each of these components mentioned above with the Arduino, create a menu on the Nokia 5110 LCD, and plot graphs on it.
Required Component
The following components are required to build this project;
- Arduino Nano or Arduino Pro Mini
- Nokia 5110 84×48 LCD
- DHT11 temperature/humidity sensor
- DS1307 or DS3231 RTC module with built-in AT24C32 EEPROM
- Rotary Encoder
- Breadboard
- Jumper Wires
Schematics
The schematics for this project takes a bit of effort. Connect the components as shown in the schematics below.
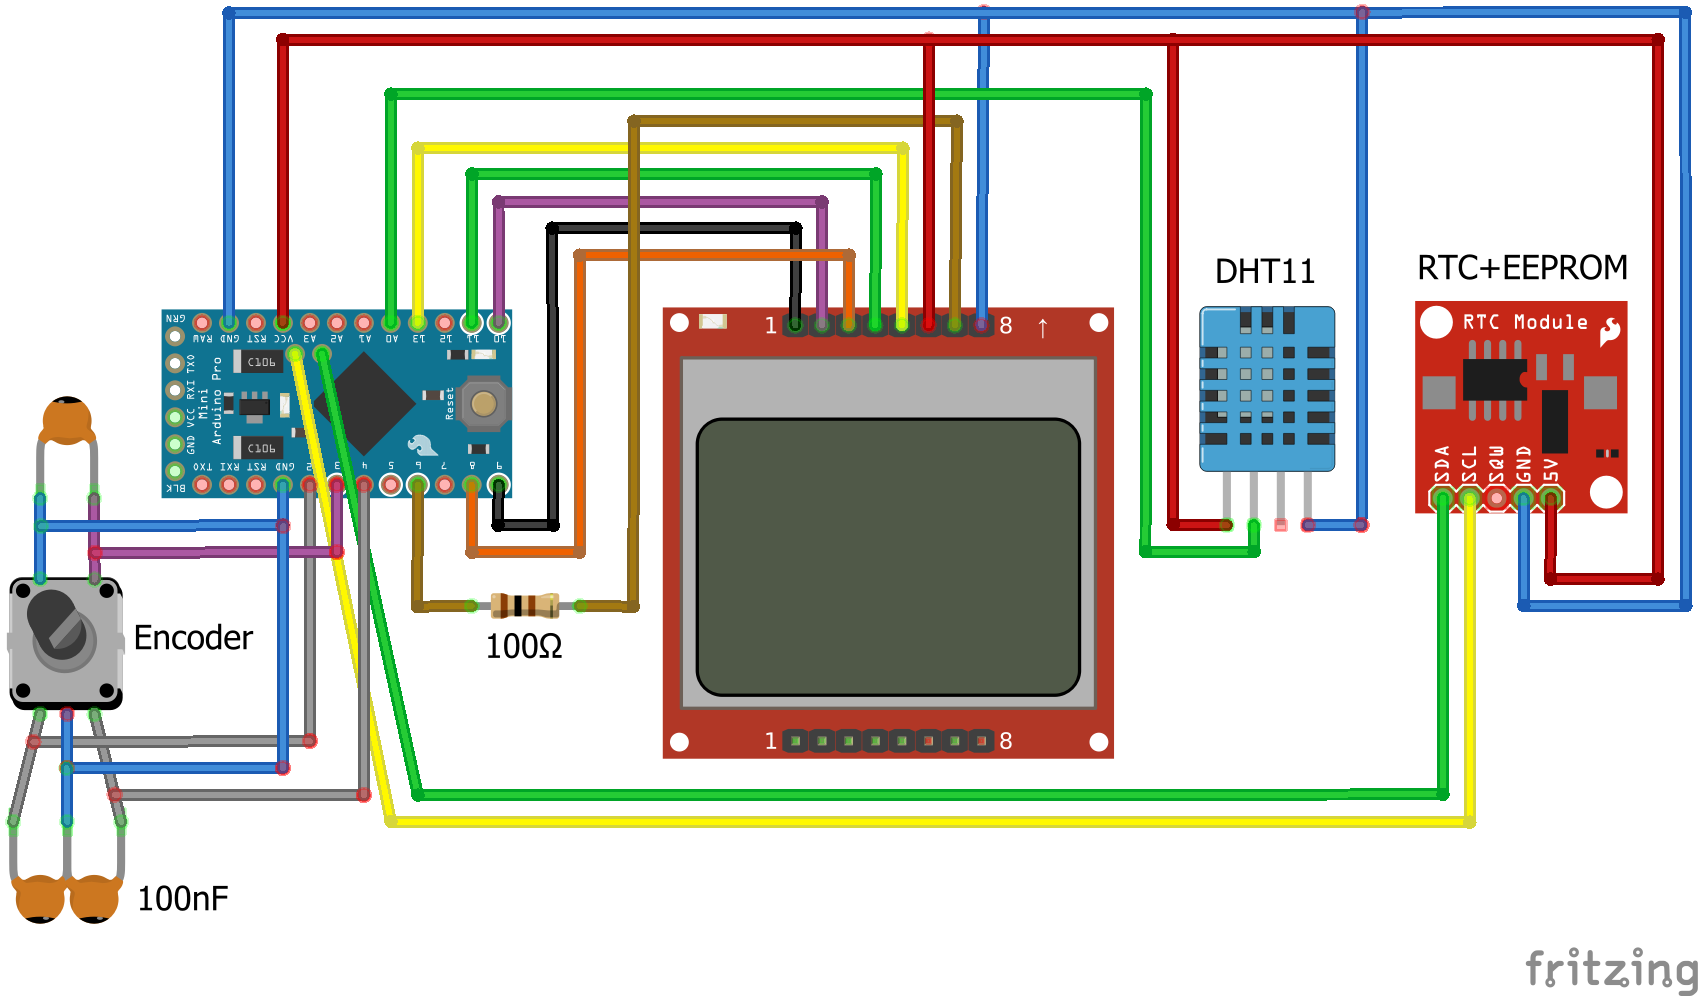
To make the connections easier to follow, a pin map showing how the components are connected is shown in the list below.
Nokia 5110 – Arduino
RST - D9
CS/CE - D10
DC - D8
MOSI - D11
SCK - D13
VCC - 5v
LIGHT - D6
GND - GND
DHT11 – Arduino
VCC - 5v
DATA - D14
GND - GND
RTC – Arduino
VCC - 5v
GND - GND
SDA - A4
SCL - A5
Rotary Encode – Arduino
PinA - D2
PinB - D4
Button - D3
VCC - 5v
GND - GND
Code
To allow for low-level interaction with the EEPROM on the DS3231 RTC, and to use minimal processing resources, we will use a custom library created by to interact with the components. Alongside the libraries, we will also create and use custom fonts which will allow users to view the data in different ways.
Since the libraries we plan to use are not standard libraries and can not be installed with the Arduino IDE, we will add them into the same folder as the code for our project so it can be easily accessed by the code. This can be done by simply copying the library files and pasting them in our project’s sketch folder.
Overall, the sketch contains over 1000 lines of code, as such, it will be impossible to explain it line by line, I will do a brief explanation to cover the basics.
We start the code by including the libraries mentioned above with the fonts we plan to give the users access to. Asides these libraries, we will also use the Nokia 5110 SPI Library and Arduino builtin libraries like; wire.h, EEPROM.h, and the AVR library. The wire.h library is used to enable SPI and I2C communication, the EEPROM library is used to make communication with the EEPROM less tedious and the AVR library is used to implement low power/sleep mode related features.
#include <avr/sleep.h>
#include <avr/wdt.h>
#include <EEPROM.h>

// define USESPI in LCD driver header for HW SPI version
#include "N5110_SPI.h"

#include "c64enh_font.h"
#include "times_dig_16x24_font.h"
#include "term9x14_font.h"
#include "tinydig3x7sq_font.h"
#include "small4x7_font.h"
#include "small5x7_font.h"
#include <Wire.h>

#if USESPI==1
#include <SPI.h>
#endif
Next, we declare the pins of the Arduino to which the pins of the components are connected and also declare some of the variables that will be used during the project.
// -------------------------
#define encoderPinA    2
#define encoderPinB    4
#define encoderButton  3
volatile int encoderPos = 0;
#define DHT11_PIN 14
#define BACKLIGHT 6
#define BACKLIGHT_MAX 11  // for always on
#define BACKLIGHT_MIN 1   // below is always off
long menuTime=0;
long logTime=0;
long lightTime=0;
int logInterval = 30;     // in minutes
int backlight = 10;       // in seconds

#define REAL_SLEEP_8S 9100L
Next, we create a struct function to log the data.
struct LogData {
  int hour,minute,second;
  int year,month,day,dayOfWeek;
  int humidity;
  float temperature;
};
To make the code modular, and ensure the void loop() function is not choked with too much code, the project was broken down into a dozen of functions each one to perform a particular task reading the encoder to determine the current screen that should be displayed to reading the DHT to get temperature and information etc. These functions are quite much and it may affect the readability of the tutorial, so you can check them out in the code, which is attached in the file under the download section.
With all the required functions in place, the next line of action is to write the void setup() function. We start by initializing serial communication and also kickstarting communications 0ver I2C by initializing the wire library. We then proceed to initialize the encoder, turn on the backlight of the LCD and get the EEPROMs ready for data exchange.
void setup()
{
  first = 1;
  Serial.begin(115200);
  Wire.begin();
  Wire.setClock(400000);  // faster
  lcd.init();
  lcd.clrScr();
  for(int i=0;i<14;i++) pinMode(i, OUTPUT);
  initEncoder();
  numMenus = sizeof(menuTxt)/sizeof(char*);

  // check if recAddr and recNum are valid, if not reset logger
  getCurAddr();
  if(recAddr>=recNumMax*5 || recAddr<0 || (recAddr%5)!=0 || recNum<0 || recNum>recNumMax) {
    clearLogAddrNum();
    writeReg(REG_LOGINT,30); // 30min
    writeReg(REG_LIGHT,3);   // 30sec
    first=2;
  }

  logInterval = readReg(REG_LOGINT);
  backlight = readReg(REG_LIGHT);
  digitalWrite(BACKLIGHT,(backlight>=BACKLIGHT_MIN)?0:1); // on
  logTime=0;
  lightTime = backlight*10*1000L;
  readMinMax();
#ifdef USE_DS3231
  writeRTCReg(DS3231_CONTROL,0);
  writeRTCReg(DS3231_STATUS,0);
#endif
}
The loop function starts by checking the battery and issuing a warning if it’s too low, then proceed to get the current date and pull the DHT pin to obtain temperature and humidity data. The temperature and humidity value are then ranked as minimum or maximum in such a way that they replace whatever value is there currently if lower or higher than it is respectively. These values are then displayed in a format that depends on the current screen in view.
To preserve power, a function called power down was implemented. It puts the microcontroller in sleep mode for a few seconds when it is not in use.
void loop()
{
  loopTime = millis();
  v=readVcc();
  if(v<2900) showLowBatt();

  getRTCDateTime(&cur);

  int ret = readDHT11(DHT11_PIN);   // only positive values - room temperatures

  if(ret==DHT_OK) {
    if(cur.temperature<minTemp.temperature) { minTemp=cur; storeMinMax(&minTemp,REG_MINT); }
    if(cur.temperature>maxTemp.temperature) { maxTemp=cur; storeMinMax(&maxTemp,REG_MAXT); }
    if(cur.humidity<minHum.humidity) { minHum=cur; storeMinMax(&minHum,REG_MINH); }
    if(cur.humidity>maxHum.humidity) { maxHum=cur; storeMinMax(&maxHum,REG_MAXH); }
    if(first) {
      if(first==2) {
        minTemp=maxTemp=minHum=maxHum=cur;
        storeAllMinMax();
      }
      first=0;
      lcd.clrScr();
    }
  }
  if(first && ret!=DHT_OK) {
    lcd.clrScr();
    lcd.setFont(Term9x14);
    lcd.printStr(ALIGN_CENTER, 1, "Sensor");
    lcd.printStr(ALIGN_CENTER, 3, "init");
    powerDown(SLEEP_2S);
    return;
  }

  handleMenu();

  loopTime=millis()-loopTime;
  powerDown(menuMode==0 ? SLEEP_1S : SLEEP_8S);
  loopTime+=(menuMode==0 ? REAL_SLEEP_8S/8 : REAL_SLEEP_8S);

  logTime-=loopTime;
  if(logTime<=0) {
    logTime=logInterval*60L*1000;
    storeRecord(&cur);
  }
  lightTime-=loopTime;
  if((lightTime<=0 || backlight<BACKLIGHT_MIN) && backlight<BACKLIGHT_MAX) digitalWrite(BACKLIGHT,1); // off
  menuTime-=loopTime;
  if(menuTime<=0 && menuMode<0) setMenu(1); // show clock
}
The complete code for the project is attached under the download section of the tutorial.
As mentioned during the introduction, the code for this project builds heavily on the code created during the Arduino Nokia 5110 Menu tutorial we published a while back. You can check that out to better understand how the code for this project works.
Demo
Go over the connections once again to ensure everything is properly connected, then connect your Arduino board to the computer and upload the code.
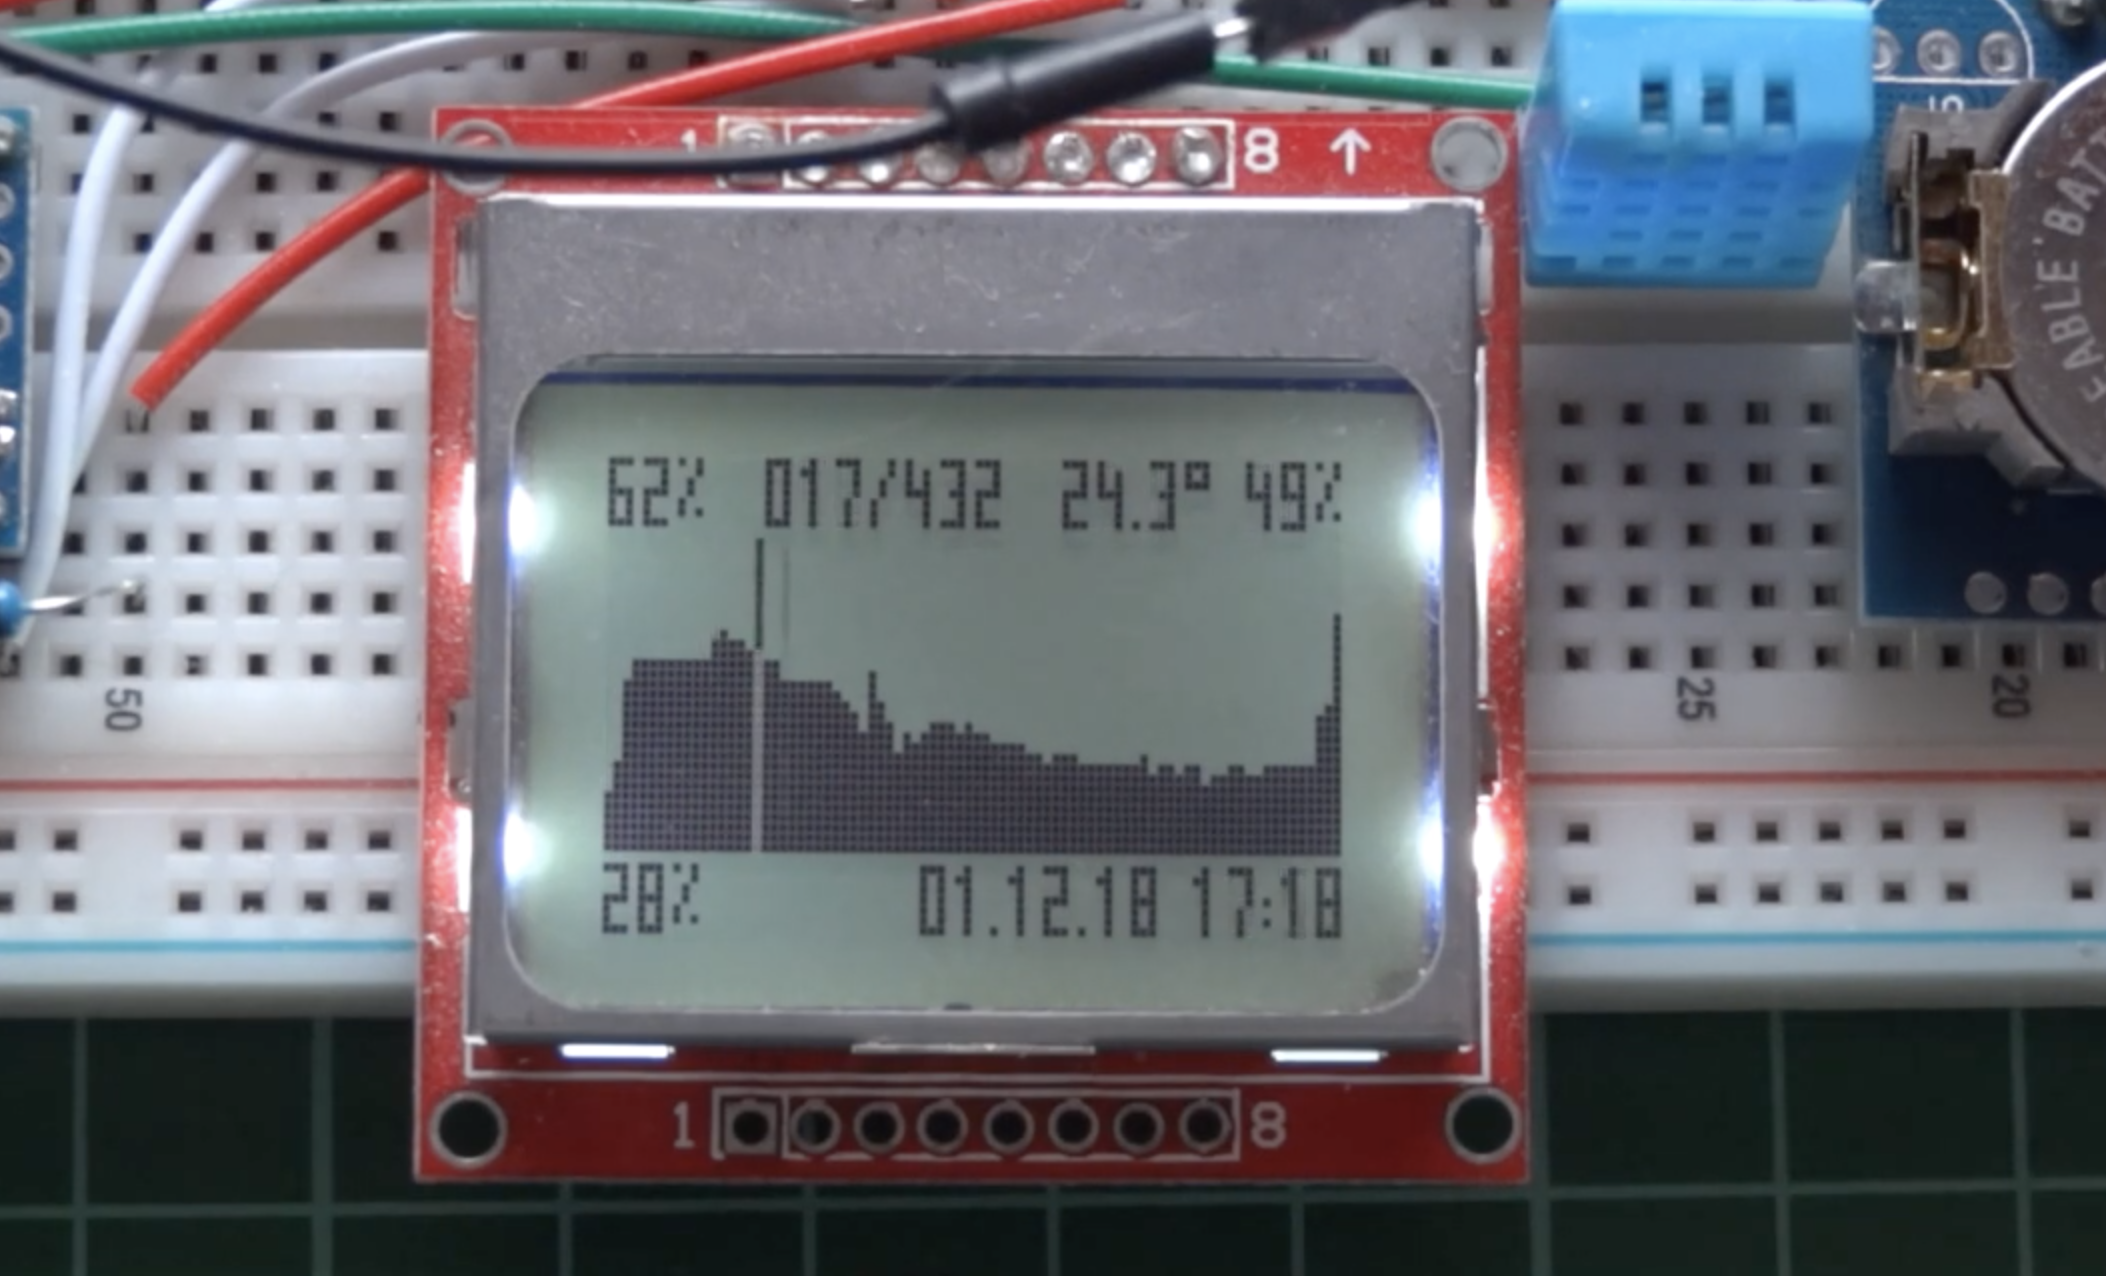
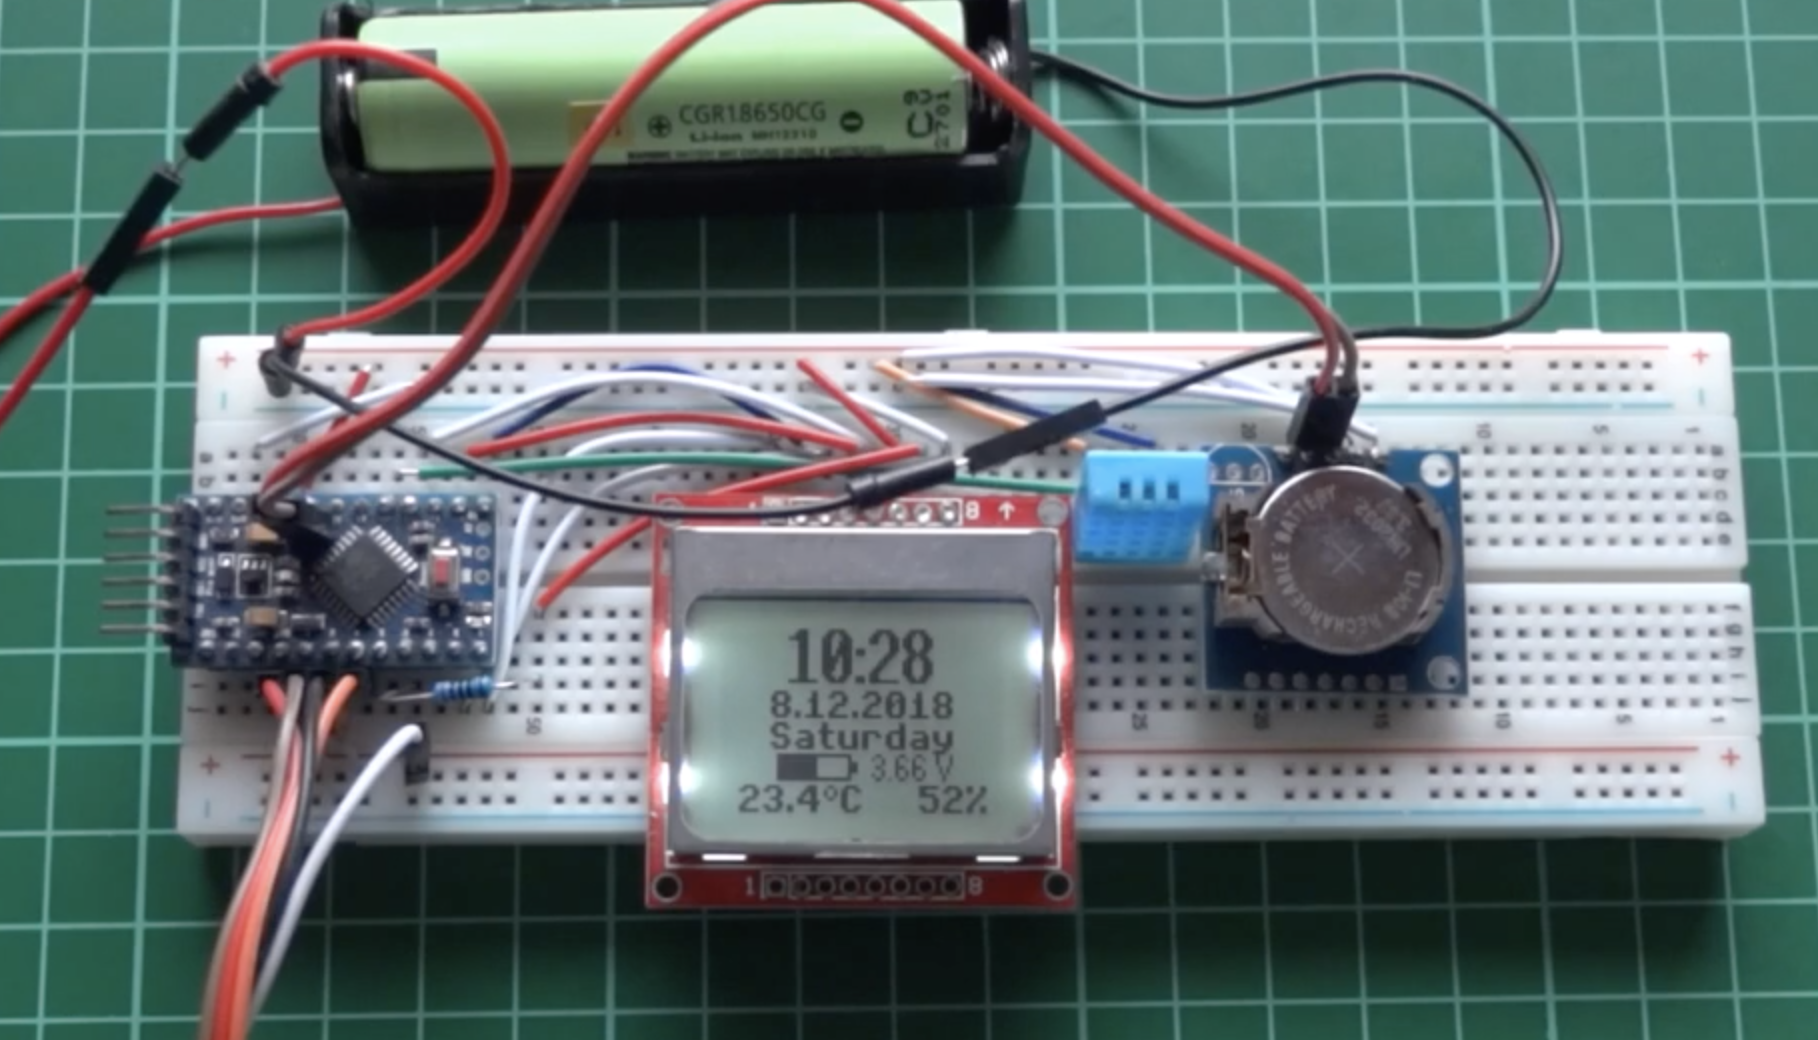
After a while, you should see the screen come up as shown in the image below.
Navigate through the screen, up and down, by turning the rotary encoder in any direction, and select an option by pushing the knob down (click the button on the encoder) to select any of the options. This opens one of the wonderful ways we have created for you to view the data.
Improving the Project
The goal of this project was to show what can be achieved, as such, there was a huge number (maybe too many) of options to show how data can be viewed on the Nokia 5110. You can start improving the project by eliminating some of these options, turning it into a streamlined, useful piece of hardware.
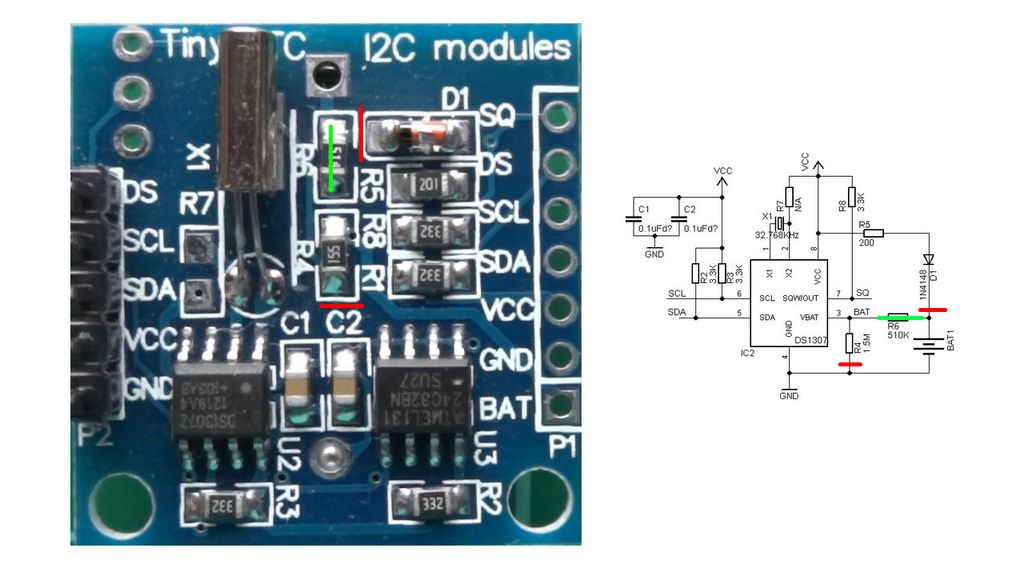
Another thing you can do to improve the project is to reduce power consumption and increase how long the device’s battery lasts. While steps in the right direction have already been taken with the sleep modes incorporated in the code, more can still be done by either using power-efficient components or modifying the current components to remove things wasting power.
For instance, by cutting certain traces (highlighted with red in the image below) on the DS1307, and removing the resistor R6 to be replaced by a solder joining bridging the two points where the resistor was soldered, we will be able to considerably reduce the amount of power consumed by it without affecting performance.
That’s if for today’s tutorial, thanks for reading and following through. Feel free to reach out to me via the comment section if you have questions about the project.
The video demonstration of this tutorial by cbm80amiga can be found on youtube.


.png)


Very nice temperature logger shown “NOKIA 5110 LCD BASED ARDUINO DATALOGGER WITH MENU”
Wondering if this sort of project, kit or pre-built, might be for sale? Thanks
Sorry, this is only instructions, not for sale.
good morning I’m a neophyte and I don’t know how to program. can you give me step by step instructions on how to insert the libraries where I find them what should I do? I made the project loaded the sketch but it doesn’t work. I checked the program. help thanks.